DIY Glitter Flats
I've been doing lots of side DIY/crafty projects lately, and this one is turned out so great! I wanted to share. So if you're crafty, this is for you! If you'd rather see nail polish? Come back tomorrow, no polish in this post.
First up, you have to know the story behind it. My sister and brother in law told me about a "Pink Dress Run" that will be held in our area next week. They want everyone dressed up in full breast cancer duds to "run" 1.5 miles. Thankfully they say it's also acceptable to walk or even stroll.... I plan on strolling! I don't want to run in my dress. Lol. Just a good natured fun activity to raise some money for breast cancer research. I think they're a little off though, breast cancer awareness month isn't until October.... This month is ovarian cancer awareness, it should be a Teal Dress Run! I digress, anyway, so we all are excited to do this but I needed a pink dress! I didn't think I had one in my closet but turns out I do! In 2009 my family went to Munich Germany for a week. While there I bought myself a hot pink dirndl! They were so cute in the department store, I just held my breath and forked over the money. I knew I had to have one. Now here we are 2 years later and it still fits! (thank goodness) I thought it would be fun to wear to this sort of event because they are giving out awards for best dressed and most creative....
Well I didn't want to wear my plain sneakers with this outfit! It had to be extra fun and pinked out! So I found several blogs with how you can diy some custom glitter shoes! Ballet flats or sneakers, whatever! So I thought this would be an easy way for me to get the perfect shade of pink glittery shoes to wear with my dirndl.
Here is how you can make your own!
What you need:
1. Shoes - I bought some cheapo black fabric ballet flats from Wal-Mart for $9.98. They had little bows tied on the top of the toes, I just cut that off.
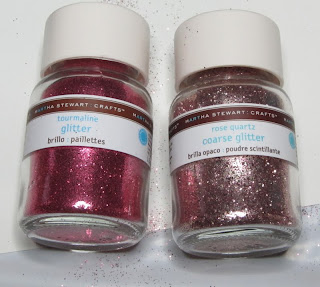
2. Glitter - Martha Stewart got involved. I found these at my Michael's store for $4.99 each. I knew I wanted to mix the two to get the right shade of pink and mixed sizes. (Note- the glitter goes further than you think. I thought I would use a good bit of these, but now that I'm done, barely any is missing out of the container....)
3. Mod Podge - I don't remember what this cost, but I got it at Wal-Mart too. (Goes a long way as well, you can get away with buying the smallest available.)
Set up your workspace. I like to do my crafty-thang sprawled out all over my living room floor. So I put down a garbage bag laid flat as my "tablecloth." Put down a piece of scrapbook paper or something that you can sprinkle the glitter over and then pick the paper up to funnel the extra glitter back in the bottle.
Get the right mix of glitter. I poured them into a paper cup to then shake out over my glued areas. I used a ratio of half fine dark pink & half coarse light pink.
Get a small paintbrush (small compared to normal paintbrushes! Large compared to anything you've used in nail art!) "Paint" the Mod Podge on in small sections at a time. Careful to do an even layer, if you have large globs of glue, you'll end up with globs of glitter and an uneven finish.
Shake glitter out of the cup over the glued area.
Make sure and rotate the shoe as your shaking the glitter out, you want the glitter to catch from all angles. Once it's thoroughly glittered, turn it over and tap it lightly to shake off the excess.
Repeat the previous steps, doing a small section at a time. I was just careful when painting the Mod Podge along the line of the sole and no stray glue or glitter got down there. If you'd like to, you can mask off the sole or ribbon edge with tape. Whatever makes you more comfortable.
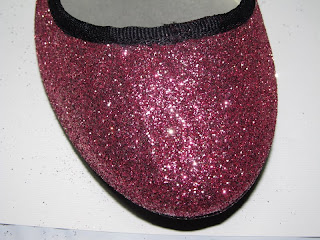
Then you have finished glitter bomb shoes!
(click this photo to enlarge, it's so sparkly!)
You can use a clear spray paint sealer as the final step, but it's not necessary. Once the Mod Podge dries, the glitter is not going anywhere. :)
So here is a pic of my dirndl that these shoes match perfectly to.
(I'll show you pics from the actual event once it's happened. Then you'll see what the dress looks like on a person!)
I also picked up these teacup saucer size metal disc earrings for cheap. I thought I would bling them out with the same glitter. I first did the breast cancer ribbon shape in Mod Podge and sprinkled light pink glitter. Waited for it to dry a bit, then filled in the blank space with Mod Podge and dark pink glitter.
No flash so you can see the ribbon.
With flash so you can see the GLITTA!!!!!
Anyway, I'm pumped! I hope you enjoyed this DIY crafty post. If you'd like to see more of this type of stuff, let me know. I'm all the time crafting up something with a hot glue gun, or elbow deep in glitter.
DIY Glitter Flats
 Reviewed by Unknown
on
2:00 PM
Rating:
 Reviewed by Unknown
on
2:00 PM
Rating:


Post a Comment