French Tip Dip Tutorial
Can I just say that I'm loving "Nail Files" on TV Guide Network? The Painted Nail looks so incredibly cute. I love the decor. Despite my hatred for most reality shows, I can't help but love this show. Its about nails, hello!? So yes, my DVR has been set on high alert to record every episode. ;) Her little white smart car is the only hideous part of the show. Lol
Kim reviewed the French Tip Dip kit here. Some asked to see a tutorial, so here we go. First off, I apologize for the terrible lighting. It was late afternoon and we were watching "True Grit" in the background and didn't have the overhead lights on.
Kim reviewed the French Tip Dip kit here. Some asked to see a tutorial, so here we go. First off, I apologize for the terrible lighting. It was late afternoon and we were watching "True Grit" in the background and didn't have the overhead lights on.
She started with the usual prep, base coat, then wanted to make sure no staining showed. She applied Sally Hansen Cafe Au Lait.
You then pour some of the white tip polish into the little tiny glass container. Not much, just however deep you want your french to be. (Don't think you're wasting polish here. The glass container comes with a air tight screw on lid that keeps the polish from drying out so you can use it again the next time.)
Dip the right size end of the tool into the polish. (4 sizes, before you dip it make sure you pick which side will fit your nails best. In most cases, the same size tool can be used on all 4 fingers, then next size up for your thumb.)
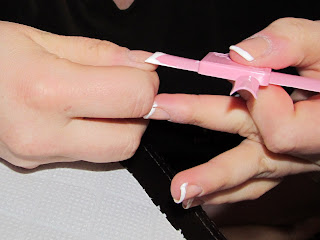
Pull the tool straight out of the polish and it picks up some on the end in a proper smile line curve.
Then the instructions say you can do the application multiple ways, but Kim says that she prefers to lightly touch the tool down to center of the nail tip, then pull it back up. Then turn it to fit the curve of the nail and lightly touch at the edge nearest the cuticle. Repeat on the other side. So she is lightly touching down two - three times per nail. It's like Konading in that you have to move kind of fast. If you get the hang of it, the tool holds enough polish to do all four nails on one hand before re-dipping.
Move to the next size up, dip, and do thumbs.
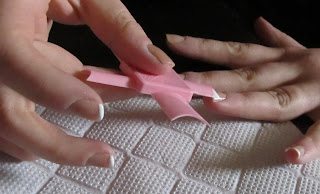
This is a shot of the tool. You can obviously see which two sides she used. The other sizes fit just right for toes!
It's made of a slightly flexible plastic. You can just clean it up with some polish remover and you're ready to go next time.
Finished shot with topcoat.
This is the gigantic bottle of white tip polish that it comes with. It holds 33ml, compared to some standard 14ml bottles you might be more familiar with. It's a really nice opaque, easy to use, white. Good formula. The kit also comes with a sheer french polish, but it's "barely there" nude sheer, and Kim wanted to cover staining so she didn't use it this time. The kit also comes with a "quick dry" topcoat, that is not so quick dry... Nice, but not great. The sheer polish, and the topcoat come in standard size polish bottles.
Kim really likes it and she's able to do it really quickly without a lot of fuss. The containers and tool can be used with other polishes as well. So you can go crazy doing a funky french with different colors other than white.
Hope this helps someone!
French Tip Dip Tutorial
 Reviewed by Unknown
on
4:00 AM
Rating:
 Reviewed by Unknown
on
4:00 AM
Rating:


Post a Comment